LXDE + NoMachine Low Memory Auto-Install Script

This is a little script I’ve been tinkering with for a bit now, it installs LXDE + NoMachine for remote desktop access.  It’s a minimalist script based around low ram usage (perfect for LEBs!), it just installs a bare desktop, a web browser(iceweasel) and a means to access it, any other programs i.e. VPN, torrent client, etc.. must be installed by the user.

Update 1/05/15: An Android/iOS client is now available for NoMachine, please see the links below for the APK/iOS store link.  I’ll be adding a configuration guide for the Android client shortly.

Update 3/24/14: Fixed an issue with package and client URLs not resolving, also fixed a bug in the libcairo section of the script.  Please continue to report your feedback.

Usage:

wget http://www.sonicboxes.com/nx/autolxde.sh
chmod 755 autolxde.sh
./autolxde.sh

At the end of the script you will be asked if you want to create a user,

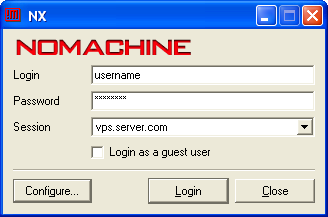
You cannot login to NoMachine as root
If you already have a non-root user, you don’t have to add another.

Add a new user? (y/n)

If you have already created a user enter n, if you have not created a user and only have the root then you should enter y and create a user at this time.  You will be prompted you the username and desired password.

You will also need to install the NoMachine client on your local machine in order to remotely access the desktop.
Windows Client – Linux Client – All other OS – Android – iOS (iPad Only)

After installing the client you need to point it at your NX/LXDE server installation. Start by running the NX Connection Wizard.

nomachine_connection_wizard1
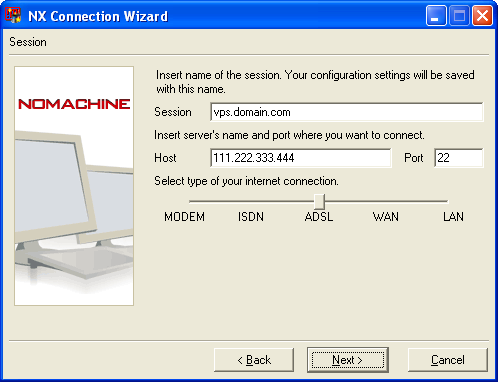
Type what you’d like to name the session,  then enter you servers ip address or hostname.
Click Next
nomachine_connection_wizard2
Select Custom Desktop
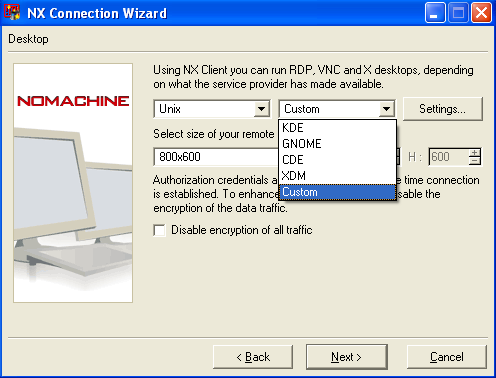
Select the desired resolution or select Custom to enter a resolution manually.
Click Settings
nomachine_connection_wizard3
Check “Run the following command” and type startlxde in the box provided.
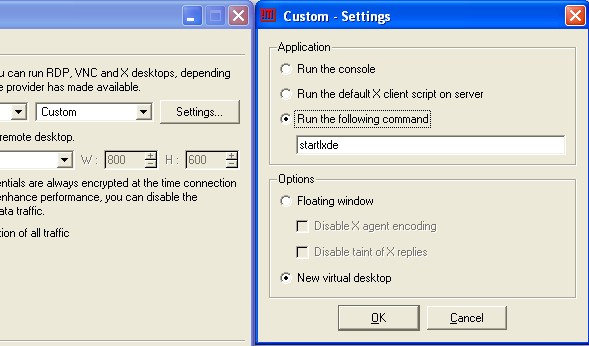
Select New Virtual Desktop
Click OK
Click Next
Click Finish
Now that your connection is configured, go ahead and start NoMachine Client
nomachine_connection_wizard4
Enter your username and password and select Login


nomachine_lxde_desktop

If everything worked correctly up till this point, you should now be staring at your new Remote LXDE Desktop.

18 thoughts to “LXDE + NoMachine Low Memory Auto-Install Script”

  1. Hello,

    I have an error here.
    It says that: “Server configuration error. Cannot login. Please contact your system Administrator.”

    I’ve done everything stated in the guide. I’m using Port 22.

  2. Hi.. I have some dumb question 🙁
    Please explain more about the low ram usage, what is the minimum vps spec suggestion to run this smoothly? what the best linux distro for this? Thank You

    1. Well, first of all this script will only work on Ubuntu/Debian. Either distro will work just fine, the main difference being that Ubuntu typically has newer packages but I personally prefer Debian.

      Minimum spec can vary, I’ve had this script running successfully on a 128MB VPS, however what you’re using it for will determine your specs. If you plan to browse a lot of content heavy websites, you will use quite a bit of ram, I would recommend 512MB with 256MB being the minimum.

  3. The .deb download links referred by the script and the client download links on this page are broken (404). Is it possible to restore them? at least temporarily. Thanks.

    1. Thanks for your comment, I’ve got that sorted out and everything should be working properly. I reconfigured my website’s setup away from VestaCP and forgot to configure the subdomain that contained the NoMachine files.

      Please keep the feedback coming.

    1. If you’re getting the error, Cannot Run starlxde then either LXDE didn’t install properly or that your path is wrong. What happens if you try to run startlxde from SSH as root, do you receive the same message?

  4. Wow thanks @nunim, it works like a charm!

    My specs:
    Ubuntu 12.04
    512 MB RAM

    Initial error “Server configuration error.”
    Solved with:
    apt-get install xauth

  5. Awesome work, thanks for creating it and hosting the files!

    Is there a java nx client? Something that could be accessed without having to install the client?

    The nomachine nx web companion seems to do this, but I can’t get through all of the “sales speak” to figure out what exactly it does, or whether it works with nomachine 3.x

  6. I’m getting “the nx service is not available or the nx access was disabled on host”.
    Fresh Deain 7×64 out of the box.

    Seems like you need to add Authentication Key integration. The guide is not complete!

    1. Are you using the NX4 client?

      Changing the key requires changing it server and client side as NoMachine ships their own key by default.

  7. Thanks for your great work.
    Do you have any idea on file transfer using NoMachine?
    Besides, OpenNX doesn’t work on Yosemite. I have to use NoMachine 4 client to connect.

Leave a Reply

Your email address will not be published. Required fields are marked *